Roofing – The Outer Protective Layer of Your Home

Fort Myers Roofing is the outer protective layer of your home. It helps drain water and snow, blocks sunlight, and insulates against extremes of temperature.

Roofs can be built on site from rafters or pre-fabricated trusses. Generally, they sit on sheathing—usually 1-by-4 plywood or OSB boards. Sheathing may be field-applied or factory-coated.

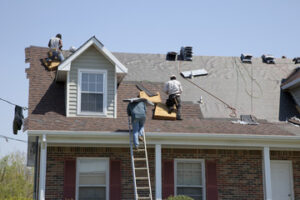
There are many roofing materials to choose from, and each has its own pros and cons. A professional roofing contractor can assist you in making the right choice for your home, taking into account factors like lifespan, air quality requirements, extra structural support needs, climate compatibility and aesthetics.

Asphalt shingles are the most popular roofing material for residential properties. They are easy to install and offer good durability in wet climates. Wood shingles and shakes are a more rustic option, crafted from cedar, redwood or cypress. They are expensive, but can last up to 30 years and provide excellent insulation value.

Tile roofs are often made from clay, granite or terra-cotta and can add to the architectural design of a house. These roofs are long-lasting and energy efficient, but they are heavy and require more frequent maintenance than other types of roofing.

Metal roofs are becoming more common, and there are a variety of options to consider. Steel roofing is affordable and durable, and some manufacturers use an energy-efficient reflective coating to help reduce the amount of heat that your roof absorbs. Aluminum is another lightweight metal that offers good resistance to corrosion. These roofs are sometimes combined with other materials to improve performance and aesthetics.

Built-up roofing, or BUR, is an ideal option for flat and low-pitch roofs. It uses several layers of water-resistant materials that are built up in overlapping rows. Felt impregnated with asphalt is used in the bottom layer, followed by tar and finally gravel or crushed stone.

Other types of roofing include epoxied rubber membrane, PVC, TPO and PTFE (synthetic fluoropolymer). EPDM is an affordable option for flat roofs, while TPO and PTFE are commonly used for commercial buildings. The latter two are also used for garages and sheds, where the lower roof is less exposed to sunlight.

There are a variety of roofing systems available to protect your home or commercial building. The type of roof you choose will depend on your budget and the climatic conditions where you live. Roofing materials such as asphalt, tar, rubber, clay, wood, and composite material are all designed to keep the elements out.

A popular residential roofing system is shingles, which come in many colors and styles. They are also durable and affordable. If you want a more unique look, slate or tile are good choices. These types of roofs can last up to a century and are considered a luxury for some homeowners.

Built-up roofing (BUR) is one of the oldest types of roofing for flat or low-pitch roofs. It is composed of 3-5 layers for enhanced protection, particularly in extreme climatic conditions. It can be installed in a number of ways including self-adhesive sheets, hot mopped asphalt, torch applied or cold adhesives and may be mechanically attached.

Single-ply membranes, which are either thermoplastic or thermoset, are another popular roofing option. Typically, they are made of polypropylene or ethylene-propylene rubber that is chemically fused together. They are suitable for both low and steep-slope roofs and can be heat-welded, heat-cured or adhered using cold adhesives.

Insulation is another important part of a roof system. Cellulose, mineral wool and foam are common types of insulation used in roofing applications. Extruded polystyrene (XPS, or XEPS) is an increasingly popular roofing insulation due to its high R-value and durability, particularly when compared to polyisocyanurate. For roofs where pipes are to be positioned, a fire-rated XPS insulation is recommended.

Insulation is an integral part of your roof, offering you a variety of benefits, from thermal resistance to moisture protection. It stabilizes indoor temperatures and reduces energy consumption, resulting in significant savings on your utility bills. Additionally, insulation protects against the buildup of moisture that can cause structural damage and mold and mildew growth.

There are a variety of roofing insulation options to choose from, depending on your specific needs. Fiberglass is an extremely common option, as it’s inexpensive and easy to install. It’s also moisture resistant, which is a huge plus in areas with high humidity and rain.

Other popular roofing insulation options include foam board insulation, such as extruded polystyrene (XPS) and expanded polystyrene (EPS). These rigid foam boards are highly effective at reducing energy bills, as well as protecting against moisture, fire and noise. Rigid foam insulation is also lightweight, making it easier for contractors to handle.

Another type of roofing insulation is spray foam, which is applied to walls and ceilings using a polyurethane or latex spray. This spray expands and seals, creating an airtight seal that prevents moisture and pests from entering the home. Spray foam is expensive, however, and can be difficult to work with.

A more durable option is fiber cement boards, which are made of cellulose, sand and cement. They are fire-resistant and stand up to extreme weather, making them a great choice for harsh climates. These are more costly than other types of insulation, but they offer a higher R-value per inch and can help with energy efficiency.

There are also a variety of loose-fill insulation products available, which can be blown into gaps between wall studs and ceiling joists. This type of insulation is usually made from fiberglass, but it’s also available in cellulose (which is typically made from processed recycled paper) and mineral wool. Loose-fill insulation is relatively easy to install but can be challenging in hard-to-reach spaces. It can also be prone to dust and mold accumulation. A newer form of roofing insulation is spray-in foam, which is applied using a polyurethane or latex coating and expands to fill space and create an airtight seal.

Your roof takes a beating from wind, rain, snow, sunlight, and extremes of temperature. This is why good roofing requires regular maintenance to ensure it stays in top condition. This prevents small problems from becoming big ones, and helps prolong the life of your roofing materials.

A roofing company can help with regular maintenance by assessing the areas most likely to leak or need attention. These include joints, seals, and flashing. Flashing is the metal material that seals around chimneys and where roofing planes meet, as well as at other areas like valleys and dormers. It can be made from a variety of materials, ranging from copper and zinc to aluminum, and can last up to 40 years if properly installed. The caulking that seals it however, will need to be replaced on a regular basis as it deteriorates over time.

During a maintenance inspection, your roofing contractor will also look for any damage to the underlayment, which is water-resistant paper or synthetic sheets that cover plywood sheathing on a roof. He will also examine the soffit and fascia, which are parts of the roof that support and direct water runoff. He will check for ice dam protection membranes in cold climates, and may recommend ventilated soffits or ridge vents to improve attic air flow and help prevent moisture build-up.

Trees near your roof should be trimmed regularly to eliminate the danger of falling branches during heavy storms. Debris should be removed regularly from drains and gutters, so that water can exit the roof efficiently during rainfalls and storms. Cleaning the soffit and fascia will also prevent insect infestation. And a proper drainage system will help your roof last longer, as it will not become damaged by standing water or rot.

Important Steps in Roofing Installation

Roofing is dangerous work that requires special tools, knowledge, and a strong stomach. A savvy team of DIYers could attempt it, but it’s generally best to leave this home improvement project to professionals.

Roofing

Roofers install underlayment and flashing to protect the roof deck and prevent leaks. They also waterproof the areas of the roof that slope, called valleys. Visit https://www.corpuschristiroofingco.com/ for more details.

Roofing materials play a key role in protecting your home or building and keeping it comfortable. They protect against rain, snow, strong winds, the sun’s heat and cold, and other harsh climatic conditions. Choosing the right roofing material is an important decision that can affect the overall functionality, efficiency, and look of your roof.

Before starting the process of reroofing, you must first choose what type of material you want to use. The choice depends on a number of factors, such as the cost, durability, and aesthetics. There are many different roofing materials to choose from, and each one offers its own set of advantages and disadvantages.

Asphalt shingles are a popular option for homeowners because they are affordable and come in a variety of colors and styles. They are also energy-efficient, which can help you save on your heating and cooling costs. Other popular roofing materials include clay or concrete tiles, which offer a classic and timeless design for your home. However, they are heavy and may require additional structural support.

Other considerations when choosing roofing materials include the climate in your area and the acoustic performance of each option. If your home is located in an area with a high traffic volume, you may want to consider a noise reduction system.

Another factor to keep in mind is whether the roofing material you are considering complies with local housing codes and regulations. Lastly, you must determine how much the materials will cost and what sort of warranty is available. It’s best to compare warranties from different manufacturers to make the most informed decision. This will ensure that you get the most bang for your buck.

Install the Flashing

If you’re having a new roof installed or replacing an old one, it’s important that you install the flashing properly. This thin layer of metal sheeting helps to direct water away from locations where it could penetrate the roof and cause damage. It’s typically made of galvanized steel to prevent corrosion. There are also other types of flashing, including copper, aluminum, and stainless steel. Depending on the roofing materials you use, different kinds of flashing may be necessary.

When it comes to installing roof flashing, you want to take the time to do it correctly. The best way to do this is to hire a professional roofer who understands the best practices, safety requirements, and building codes and laws in your area. A good roofing professional should be able to recommend the right type of flashing for your home.

To start, you’ll need to gather the correct tools for flashing installation. This includes a hammer or mallet; tin snips; roofing nails; and a caulk gun. It’s also a good idea to have a utility knife, a leveler, and a plumb bob on hand.

Step flashing is used when the roof meets a sidewall or other vertical surface. To install it, cut a piece of step flashing along the fold line and bend down the lower flap. Then, nail it into the roof deck using a roofing nail. Make sure the nail extends high enough that it will be covered by a shingle.

Kickout flashing is a piece of flashing that is placed at the end of your step flashing and helps to guide water to where it should meet the gutter. To install it, you’ll need to cut a piece of flashing along its fold line and bend down the lower flap. You’ll then need to place it against the kickout flashing, apply a bead of sealant around the bottom edge, and nail it in place.

Install the Underlayment

Underlayment is an important part of your roof. It acts as a water barrier and helps to keep the sheathing and framing underneath from getting damp. It also protects against mold and mildew.

Before the crew starts installing your roofing materials, they will first need to install the underlayment. Depending on the type of roofing you choose, there are many different types of underlayments. They will choose the one that is best for your climate and roof type. For example, if you have a metal roof, you may want to use an underlayment that is heat-resistant.

The underlayment will be installed starting at the drip edge of your roof. It will be fastened to the sheathing with cap nails. The contractor will then run the first course of underlayment across your roof, overlapping it with the next row by six inches. This pattern will continue until the contractor reaches the ridge of your roof.

It’s very important to make sure that the underlayment is installed correctly. Any damage that occurs during installation can cause problems later on. You will also need to inspect the underlayment periodically to make sure it’s still in good condition. If you do find any problems, you will need to repair them right away.

You should also make sure that you’re using the right tools for the job. Using the wrong tool could damage your underlayment and cause it to fail prematurely. This can be a problem on new construction or even on re-roofing projects. You should also avoid using staples or standard roof nails when installing the underlayment. These types of nails can damage the underlayment and void any warranties.

Install the Shingles

Whether you are installing asphalt or clay shingles, it’s important to map out your layout before you start placing them. This helps ensure that you have enough shingle material and avoid problems like too much exposure or an improper offset in successive courses (rows of shingles). You can get a better sense of your roof’s layout by laying out a few “practice” rows.

You can also use the roof’s square footage to figure out how many shingles you’ll need by multiplying length x width for each plane (each side of the house and any dormers are considered separate planes). Be sure to add up all the planes to get the total square footage of your roof.

Before you begin laying out the first course of shingles, spread sturdy tarps or blankets over plants that are close to your house to protect them from dropping tools and debris. Pull any yard games or furniture away from the exterior of your home as well.

Next, lay out a strip of felt paper across the roof. It’s usually best to stagger the strips of underlayment, if necessary, so that you have an even covering between your roof sheathing and the shingles.

Once the underlayment is in place, you can install the first course of shingles. Start at the bottom of your roof and work your way up, overlapping each course by half its width. Be sure to tuck in the edges of each shingle at the edge of the other.

Once the shingle courses are in place, hammer in nails around each one to hold it in place. Each nail should be about an inch above the cutout slots of the shingle, and the shingle should overhang the top edge by 1 inch vertically.

Install the Ventilation

Providing adequate roof ventilation is an important part of a successful roofing installation. Proper venting allows warm, moist air to escape the attic space, which helps prevent overheating in summer and ice dams in winter and protects against mold and rot throughout the year. It also can help reduce energy bills by allowing heated air to rise and escape the home.

To install a vent, first, determine where the vent will be located. If you are unsure, consult with a roofing professional. Then, using a ladder, climb up onto the roof and mark the spot where the vent will be placed. Once marked, drill a hole up through the roof, leaving the drill bit sticking up through the roof so you can find it later. Next, carefully remove the shingles surrounding the vent opening. Set them aside, if needed for future repairs.

If soffit vents are used, they should be installed along the soffits of your house, not over the framing. A ridge vent, on the other hand, is installed along your roof ride, taking full advantage of moist, warm air’s natural upward flow. A ridge vent is long metal sheet bent to fit the roof ridge, with open slots cut into it along its length. It may be covered with shingle or other roofing materials to blend in better with your home’s exterior.

Once the vents have been installed, make sure they are properly sealed to prevent moisture infiltration and promote proper attic ventilation. You will want to regularly inspect your roof vents for debris accumulation, deteriorating sealant, and other signs of poor ventilation. This will ensure they continue to function effectively and protect your home from costly moisture-related problems.